Keeping It Simple – Mouse Pad Revival

This was not the original project that I planned for this week but was inspired out of necessity.  I am forever trying to do more than one thing at a time and this morning was no exception.  I was going along answering emails, downloading some items that I needed and eating breakfast all at the same time - then my yogurt went and dumped itself all over my mouse pad.  Yuck!  Because of the protective surface on my desk I cannot work without one.  So, after cleaning up the mess, I went downstairs to the desk in the family room and pulled out a couple more.  They had certainly seen better days.  My first thought was I better put a new mouse pad on the shopping list but then I wondered and here is what that wonder produced.  I can think of at least 3 more people who might like one of these.

The first one I did for my own desk.  Then I did one for Andrea. Here is how they came out.

 Mouse Pad

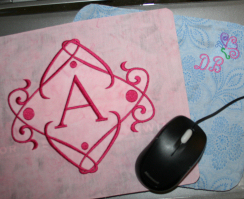
The little butterfly is from the Starbird Springtime Swirls collection and you can use any lettering software or alphabet you like.  The fancy framed A was made in Pacesetter BES Lettering software.

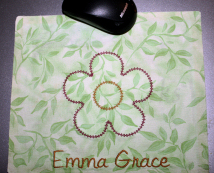
I had one more that looked pretty awful so how could I resist redoing it since I was already in the mood.  Here is what I did.

You will need:

  • One mouse pad
  • Embroider design of your choice  (Here's the link to download the flower design I used below)
  • Tear-away Stabilizer
  • Embroidery thread
  • Rectangle of fabric larger than your mouse pad
  • Fabric glue
  • Fray check, if using fabric that easily frays
  • Rotary cutter, ruler, cutting mat and scissors (Scissors only should work but wait for the glue to dry well)

Steps:

  1. Hoop the stabilizer and fabric making sure to place the area of your embroidery in the hoop center if embroidering an edge or a corner.
  2. Embroider the design.  Trim jumps and remove the stabilizer.
  3. Cover the top of your mouse pad with a thin coat of fabric glue (Finger painting is allowed here and works best for smearing it all over evenly or it takes forever to dry).
  4. Place the wrong side of the fabric over the mouse pad with design positioned as desired.  Press in place and smooth out any wrinkles.
  5. Turn embroidered side down on a cutting mat.  Align the ruler along the edge of the mouse pad and cut the fabric even with edge.  Repeat for all four sides.
  6. With scissors (or a tiny rotary cutter) cut rounded corners even with the pad.
  7. Add fray check to the edges if desired.

 Mouse Pad

Done -a revived mouse pad and a fun gift that they surely do not already have.  Now if I can find another I will have Emma do a fishing one for her Dad's Birthday next week.  It might also be a great way to use a larger test sew if you have one lying around. 

Have fun and if you get the chance show off what you make in the gallery and tell us here so we can all see it.  Have a great week.

DB

Comments (9) -

I love it and the idea is priceless.  Thanks so much for sharing.


What a neat idea.  I don't have an old mouse pad handy so I just made my own using shelf liner, (that rubber stuff, not the sticky paper).  I had some 1" squares that I had sewn together in a checker board pattern.  I embroidered a 'mouse in a thimble' on it.  Took 15 minutes for this rough one.  Think I'll tuck under some of the top material next time so I'm not having trouble with that rubberized stuff on the sewing machine.


Thank you for the great idea and fun project!


Thanks for a wonderful idea.  Got all the fixings so going to make up a few for christmas gifts. Thanks again a wonderful idea


sewbeelucy from Texas


Did you use a special kind of fabric?


Does the embroidery cause a little bit of a lump?


Sue


Glad you find this fun to do.  I just used cotton scraps.  The little bit of raised "lump" from the embroidery doesn't seem to bother my laser mouse.


DB


Very cool idea!  I'm going to give that one a shot!


Woodsy


peggyann29 9/6/2009 4:00:30 AM

db1921 I was always concerend about the raised thread hence my not doing this project sooner.  I been doing something similar with pictures for years.


Neat, thanks for the idea.


thecomputerist 9/9/2009 3:38:32 PM

This is really great!


Please login to comment
AnnTheGran.com | Beautiful people make beautiful things

AnnTheGran is Getting a Facelift!

Dear Friend, 2008 is going to be quite a year for me, and I hope it will be for you as well. My big news is that AnnTheGran is getting a complete facelift! No, I don't mean me -- I like myself the way I am (well, most days anyway) -- I mean my site! You see, as we've grown, some of my s... [More]

Personal Holiday Greeting from Ann (AnnTheGran) Cobb

In December, 1996, AnnTheGran's Design Exchange had been online for 2 months, and it was all very, very new. Our small community had shared a hundred or so designs and I sent the Christmas greeting you see on your right, created around my greatest blessings at the time.AnnTheGran, my Internet ni... [More]

Charity Project - Star Bunting with Polar Fleece Blanket

Every child is precious but sometimes the families of certain little ones face unique challenges. The charity FHCS (Faith Hope & Charity Stitches) has a very special way of sharing their love of sewing and embrodiery. The tiny buntings and quilts they make are a wonderful gift to those babies, k... [More]

Embroidered Shirt to Honor a Veteran’s Commitment

Each of our veterans is a true hero who has made a commitment to serve in times of war or peace. Our veterans deserve the full measure of our respect. This project was submitted by Sue Ellen Parker. Sue Ellen used her creative talents to show her loved one and others how proud she was of their dedic... [More]

Embroidered Greetings Cards

Our international trend continues this week with a project from Jean Isley in England. Growing up du [More]

Christmas Tree Skirt from Table Runners

To take a simple or plain idea and mold it into something personal and unique is always rewarding. Michelle Gauthier created a special Christmas tree skirt to become a focal point for holiday cheer in her home. Without spending a lot she gave of her time and love to bring special smiles to those aro... [More]

Simple Baby Quilt for Cold Northern Winters

Creating keepsakes for loved ones is such a joy for those who love to sew. With her simple blankets, Sue Kerlin shows us how she continues her love of giving to family even when life is too full for intricate details.Sue's Description:I picked this pattern of baby quilt because I am not a detail... [More]

A Little Treasure - Should I Or Shouldn't I?

  Hi, Folks,I'm in a bit of a quandary. When I set up this blog, I made it clear to the team here who help me get this to you that I really wanted the blog to focus on projects contributed by the AnnTheGran community. So far, you've all been great with that, and we've seen some gr... [More]

The Perfect Gift - Embroidered Wine Bottle Bags

Tuck a bottle of their favorite beverage inside a festive wrap - no wrapping paper required. Trisch Rosema's embroidered gifts of wine got rave reviews even though they were quick and easy. What a lovely hostess gift one of these custom wine bags would make! Or you could do as Trisch did and mak... [More]

Race Car Themed Quilt for "Big Boy Bed"

Every child's first birthday is exciting and every mother wants to create great memories of the event. This race car themed quilt was created by Gina Martinez to complete her son's graduation to a "Big Boy Bed" and give him a special birthday memory to cherish for years to come.Gen... [More]

Blown Away By Baby Blankets

This project was submitted by Kim Yunkun. I chose to post this one because it is simple but beautiful and any level of embroiderer can do it. Not everyone is an expert, but everyone can share the sense of pride that we all feel when we've accomplished something. Sometimes, when we've been do... [More]

Share Your Creations with our Community!

Our creations are like our babies! The amount of time and care we expend on a cherished project makes those products of our hands and our hearts feel pretty special.You are currently resting your eyes on my new blog. If you don't know what a blog is, don't worry about it. Neither did I until... [More]

Quick Project - Blackwork Placemats

We wanted to create a design collection that you could use to add some classic style to your project whether you are embroidering evening accessories, elegant linens or an heirloom piece. My Blackwork collection is a versatile set of ornamental designs, professionally digitized for beautiful results... [More]